FNA Process: Historical Vegetation
If you prefer to work in an automated format, we have created an ArcGIS Pro toolbox (downloads a zip file) for each step of this workflow from data processing through table export. It is still recommended that you follow the guidance written on each FNA Process page as you run the tools so that you better understand the process and do not miss important context for what the tool is asking you to input in each box. The toolbox has simply been provided for your convenience should you choose to use it.
Note: These tools were created in ArcGIS Pro version 3.2.2 and will require the Spatial Analyst extension. If you are working in a different version of the software or do not have a Spatial Analyst license, some of these tools may not work as expected.
Understanding historical fire regimes using Biophysical Settings
Conducting a fire needs assessment involves understanding historical fire regimes and vegetation types to plan for future fire management and restoration efforts. This guide will walk you through the process, focusing on the LANDFIRE Biophysical Settings (BPS) and Fire Regime (FRI) data.
This site will walk you through working with LANDFIRE spatial data in ArcGIS Pro. Please note that this workflow requires the Spatial Analyst extension. Some of the steps may work in QGIS or other open source GIS sources, but those workflows are not documented here. As an alternative, please explore the Fire Needs Assessments in R section if you would like to complete the process and do not have Spatial Analyst or access to ArcGIS Pro.
We have also created a replica of this workflow using Python and Jupyter notebooks. It does require ArcPy and Spatial Analyst, but is set up in a more automated format. If you would like to work this way, please explore the Fire Needs Assessments in Python section of this website.
Step-by-step process
Screenshots of the process are included below the written instructions for those who find them useful.
- Identify historical vegetation types
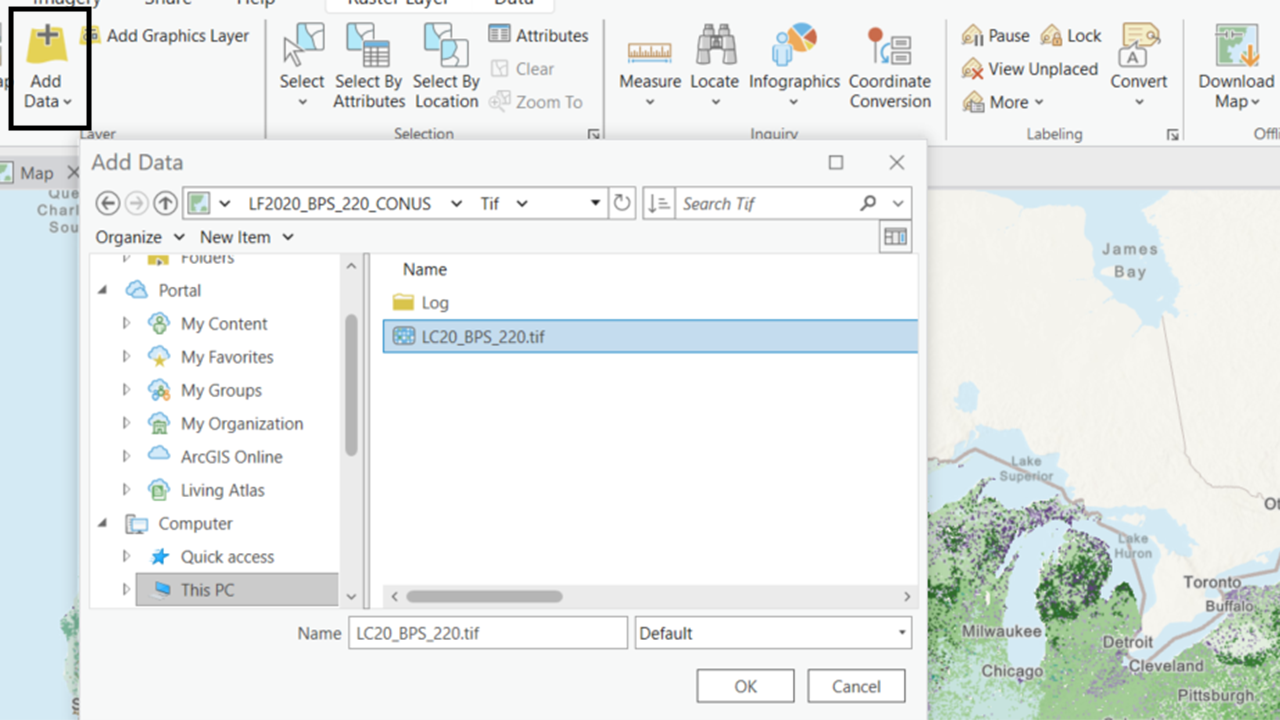
Load LANDFIRE Biophysical Settings Data: Begin by loading the LANDFIRE Biophysical Settings spatial data into ArcGIS Pro
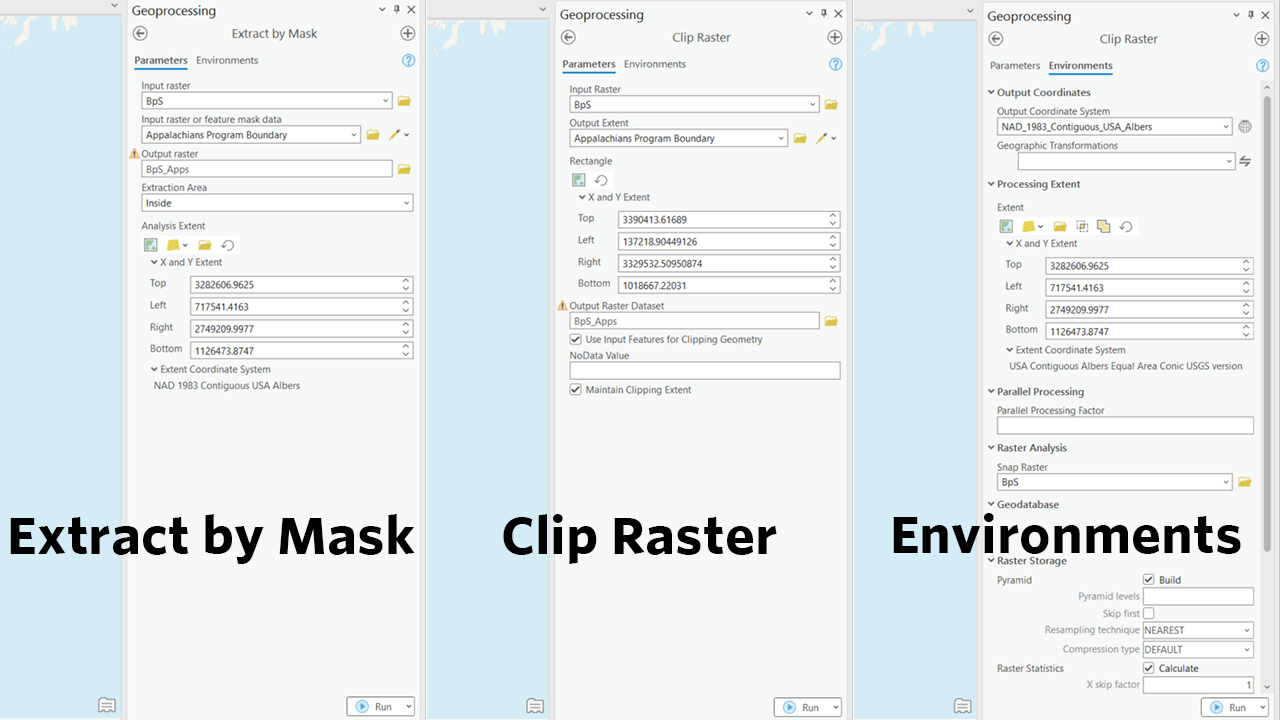
Clip to area of interest: Use the Clip Raster tool or the Extract by Mask tool (requires a Spatial Analyst license) to clip the BPS spatial data to your specific area of interest. This will help you focus on the relevant geographic region.
Identify vegetation types: Examine the clipped BPS layer to identify the historical vegetation types present in your area.
Don’t forget to set the environment settings in the tool. Most importantly, make sure the spatial reference of your output raster is correct and set a snap raster (e.g. the BPS_CONUS raster) to ensure your pixel extents match. This will be important later when you use one raster to process another.
Estimate historical fire return intervals
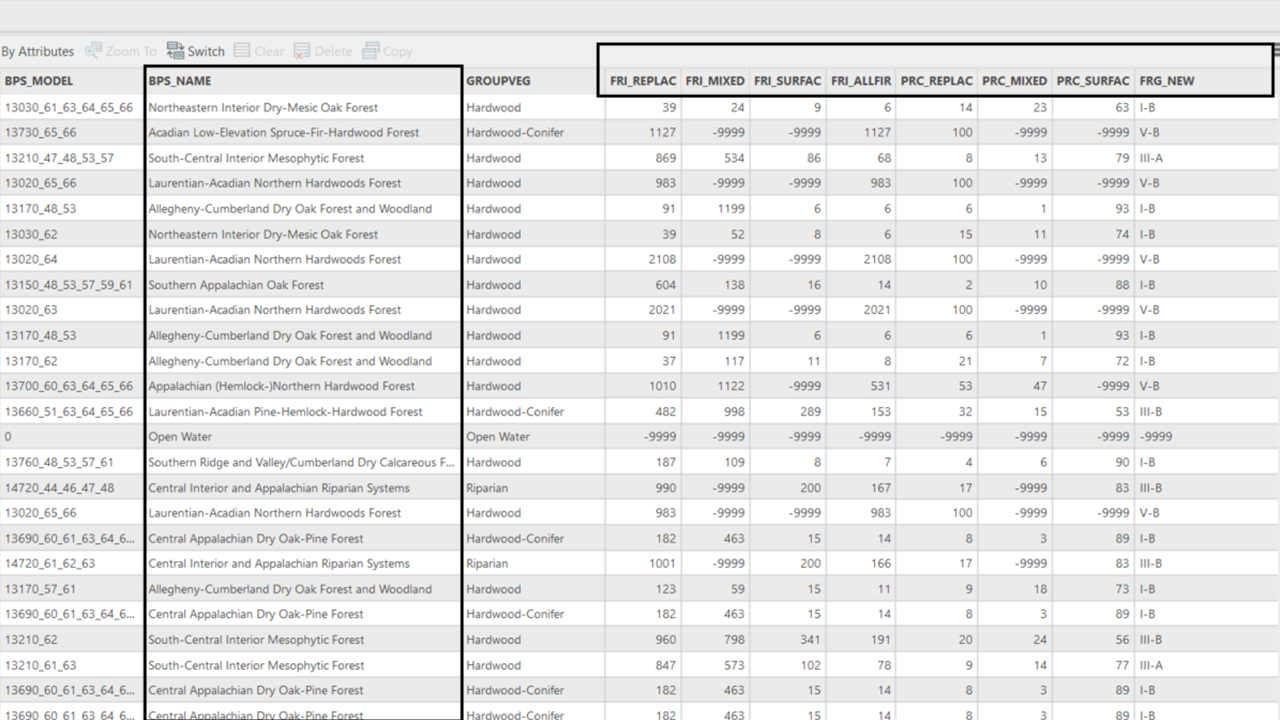
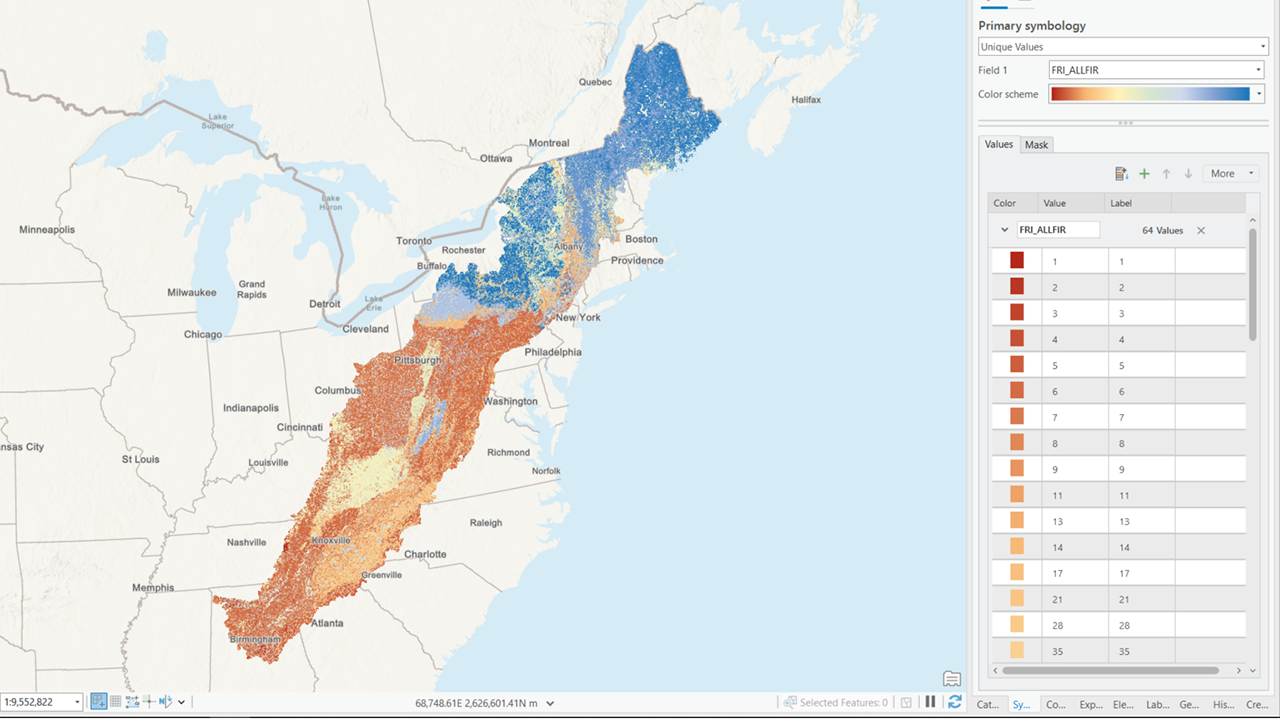
- Explore fire return interval data: The BPS data include fire return interval (FRI) information. Display the raster on the FRI_ALLFIR field to explore the historical fire return intervals for the identified vegetation type.
LANDFIRE also delivers the fire regime data separately. That dataset includes only fire severity, fire return interval, fire regime groups, and the BPS name and code. If your work is soley focused on fire regimes we suggest working with the fire return interval dataset. It will have all the information you need to complete this assessment.
Calculate historical fire acreages
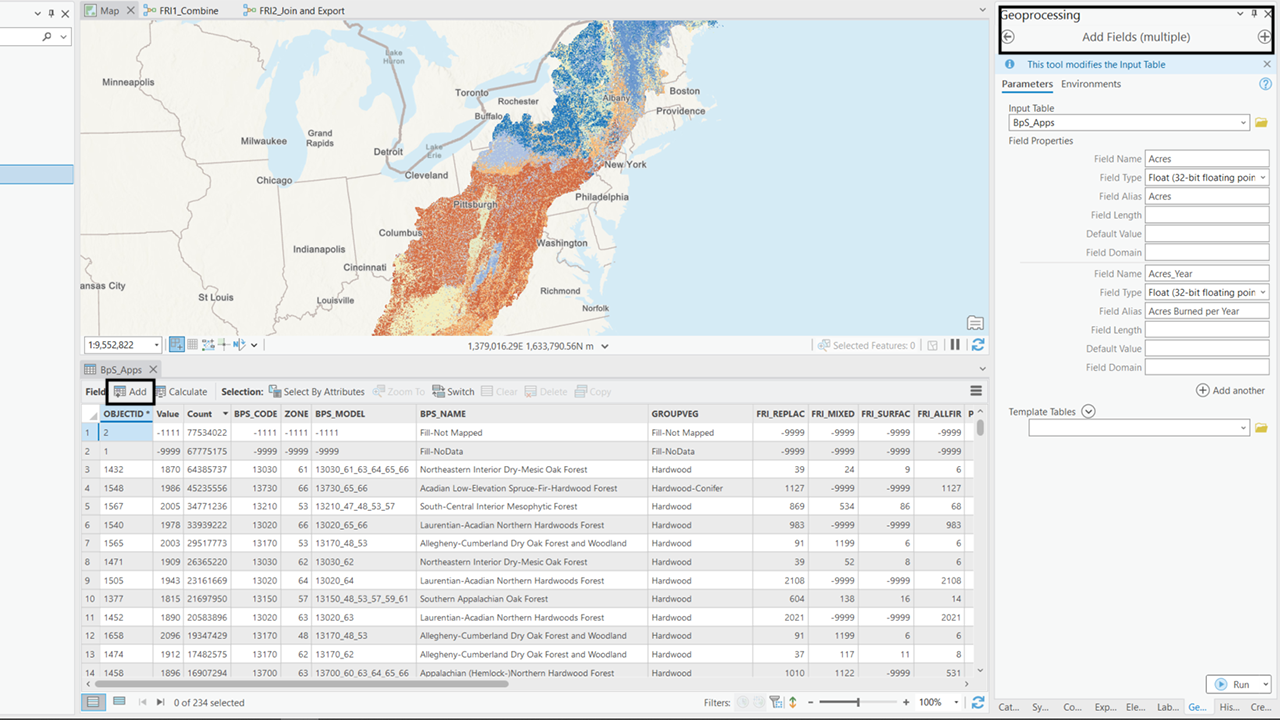
Add fields for calculation: Add an Acres field and an Acres_Year field to your clipped data.
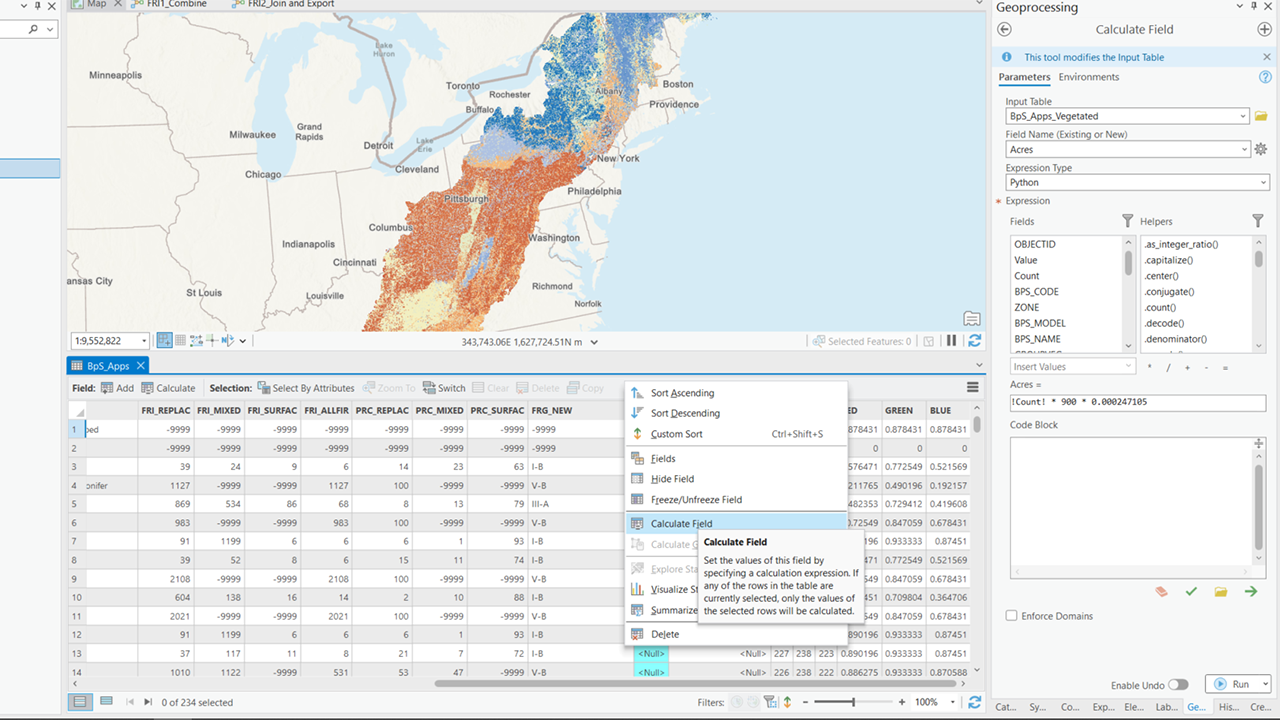
Calculate acres: Use the following formula to calculate the total acres for each vegetation type:
\[ Acres=!COUNT!*900*0.000247105 \]
Here, !COUNT! represents the number of pixels for each vegetation type, 900 is the area of each pixel in square meters, and 0.000247105 converts square meters to acres.
- Calculate acres burned annually: Use the following formula to calculate the number of acres that should burn each year for each BPS:
\[ Acres\_Year=!Acres!/!FRI\_ALLFIR! \]
This calculation will give you an estimate of the annual burned area under historical conditions.
Screenshots for understanding historical fire regime information
Still have questions? LANDFIRE is here to help.
Ask the LANDFIRE Helpdesk (email link).
Search and subscribe to the LANDFIRE YouTube Channel (see tutorials, Office Hours, quick demonstrations).
Join an Office Hour (monthly meeting with open format Q & A with LANDFIRE experts).
Schedule a meeting (email link) with TNC’s LANDFIRE Team.